
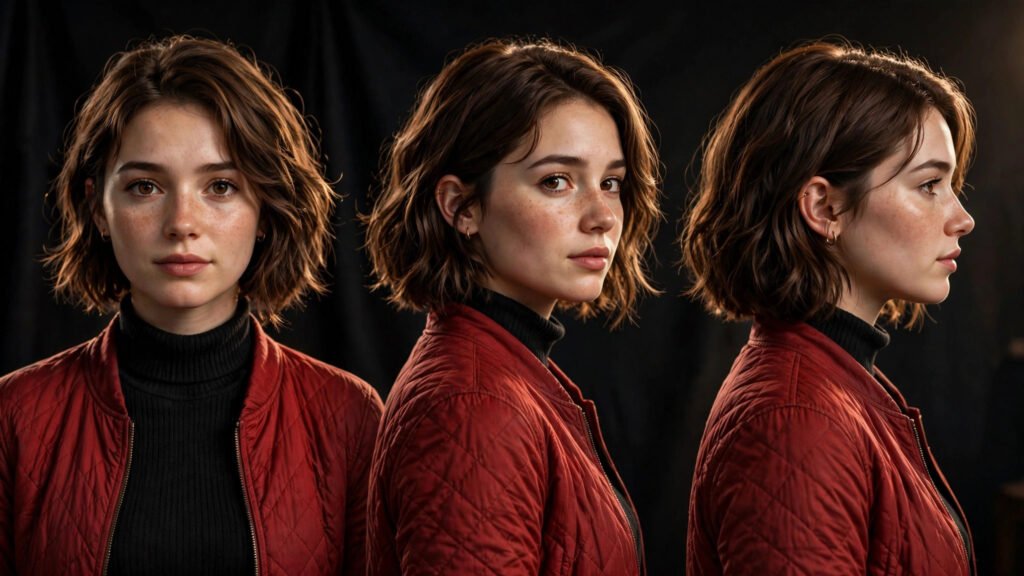
Nothing breaks the illusion of an AI video faster than a character whose face changes between shots. I learned this the hard way on an early project: a three-shot sequence where my “same” character had three different jawlines, two hairstyles, and somehow a different jacket in every clip. Each shot looked great on its own. Together, they were unwatchable. That failure taught me that character consistency is not a feature you turn on — it is a discipline you practice across every generation.
This guide covers the full toolkit: reference images, seed control, outfit and appearance locking, and the description discipline that holds it all together. These techniques work across the major AI video tools, and they stack — the more of them you use together, the more stable your character becomes.
Why AI Characters Drift (and Why It Is Your Problem to Solve)
AI video models do not have a persistent memory of “your character” unless you give them one. Each generation starts from noise and your prompt, and tiny variations in that starting noise produce a slightly different face. The model is not being careless — it is doing exactly what it was built to do, which is generate plausible variations. Consistency has to be imposed from the outside.
The drift gets worse across longer sequences and bigger changes in angle, lighting, or expression. A front-facing portrait is easy to keep stable. A character who turns, walks into different lighting, and emotes across five shots is a real consistency challenge. Understanding this helps you plan: the more ambitious the sequence, the more consistency anchors you need. My broader guide to building consistent worlds and characters covers the planning side of this in depth.
Anchor 1: Reference Images (Your Strongest Tool)
A reference image — sometimes called a character reference, face ID, or image prompt depending on the tool — is the single most effective consistency technique available. Instead of describing your character in words and hoping the model imagines the same face twice, you give it an actual image to match. Most current AI video tools support starting from or referencing an uploaded image.
The workflow I use: first, generate or select one strong portrait of your character — front-facing, neutral expression, clean lighting. This becomes the master reference. Every subsequent generation references this same image. Do not chain references (using shot 2 as the reference for shot 3, then shot 3 for shot 4) — small drifts compound with each hop, and by shot 6 your character has quietly become someone else. Always go back to the master.
One more detail that matters: keep the reference consistent in what it shows. If your master reference is a headshot, it anchors the face well but says nothing about the outfit. For full-body consistency, use a full-body or three-quarter reference. I keep two masters for important characters: a face reference and a full-body reference, and I use whichever the shot needs.
Anchor 2: Seed Control (Your Second Strongest Tool)
The seed is the number that determines the starting noise of a generation. Same prompt plus same seed equals the same output — or very close to it. When you find a generation with a face you like, note its seed. Reusing that seed with modified prompts keeps the underlying identity far more stable than rolling fresh randomness every time.
The practical method: generate several variations of your character, pick the best face, lock its seed, and then vary only the action, angle, and scene description around it. Change one thing at a time. If you change the seed, the outfit description, the lighting, and the camera angle all at once, you have no idea which change broke consistency. For the full technique on using seeds to stabilize output, see my guide to seed tricks that stabilize motion — the same principles apply to faces.
Anchor 3: Outfit and Appearance Locking
Faces get all the attention, but outfits drift just as often and are just as distracting. The fix is a locked appearance description: one fixed block of text describing your character’s look, copied word-for-word into every prompt. Not paraphrased. Not “similar.” Identical.
Mine look like this: “Maya, a woman in her late twenties with short wavy brown hair, light freckles, wearing a red quilted jacket over a black turtleneck.” That exact string goes into every prompt featuring Maya. The repetition feels robotic when you are writing, but it is precisely what the model needs — identical tokens produce identical interpretations. Change a single adjective and you have given the model permission to reinterpret the whole look.
Include the details people forget: hair length and style, distinctive features (freckles, glasses, scars), every visible garment, and colors stated plainly. “Red jacket” is better than “stylish outerwear.” Precision beats poetry for consistency work. If you use avatar-style tools for talking-head content, the same discipline applies — my comparison of AI avatar video tools notes which ones handle persistent characters best.
Anchor 4: Description Discipline Across Shots
Here is the unglamorous truth: most consistency failures are prompt discipline failures. Shot one says “short brown hair,” shot two says “brown bob,” shot three forgets the hair entirely. The model did not drift — you did. Build a character sheet (even a simple text file) with the locked description, the master reference filenames, and the winning seed, and consult it before every generation.
I also keep lighting and style descriptors locked the same way. If shot one is “cinematic warm lighting” and shot two is “moody blue tones,” the same face will read as a different person because the color science changed. Consistency is holistic: face, outfit, lighting, and style all need the same locked language. My walkthrough of cinematic prompt styles shows how to build a reusable style block you can paste into every prompt.
What Makes a Good Master Reference
Not every portrait works as a master reference. The best ones share four traits: front-facing or slight three-quarter angle, neutral expression, even lighting with no harsh shadows, and a clean uncluttered background. You are giving the model a clean read of the face — dramatic lighting and extreme angles in the reference itself just add noise the model has to interpret.
Generate a batch of candidates and pick the one where the face looks most “average” for your character — not the most beautiful render, but the most representative one. An overly stylized reference (heavy rim light, intense color grade) will push every downstream generation toward that style, even when the scene calls for something else. Neutral in, consistent out. Save the style for the prompt, not the reference.
Handling Hard Cases: Angles, Expressions, and Motion
Profile views and three-quarter turns are where faces break most often, because the model has less facial information to work with. When I need a difficult angle, I generate it from the master reference using image-to-video rather than text alone — the reference gives the model the actual face geometry to rotate, which is far more reliable than a text description of “the same woman in profile.”
Expressions are the next trap. “Smiling” and “crying” reshape the face dramatically, and the model sometimes rebuilds the face around the expression instead of applying the expression to your face. The workaround is mild language: “slight smile” and “soft concerned expression” preserve identity better than extreme emotional directions. Generate the emotion as a variation of the locked character, not as a new character who happens to be sad.
Fast motion and motion blur also eat faces. If a shot needs both action and a recognizable character, consider structuring the sequence so the face is clearly established in a calmer shot before the action starts. The viewer’s brain will carry the identity through the blur if it has already locked onto the face — the same principle editors have used with stunt doubles for decades.
A Practical Consistency Workflow
Here is the full workflow I run for any multi-shot character project. First, design the character and generate the master references (face and full body). Second, write the locked appearance block and save it in a character sheet with the winning seed. Third, plan the shots, noting which ones are high-risk for drift — profiles, extreme angles, strong expressions.
Fourth, generate in order of difficulty: easy establishing shots first to confirm the anchors hold, then the hard angles using image-to-video from the masters. Fifth, review every shot against the master reference before moving on — compare faces side by side, not from memory. Memory is generous; side-by-side comparison is honest. Regenerate failures immediately rather than hoping the edit will hide them; it will not.
This workflow scales down fine for quick projects too. Even for a single short made on your phone, a locked description and a reference image take two minutes and prevent the most common consistency failures. If you create on mobile, my roundup of the best mobile AI video apps covers which apps support reference images.
Final Take
Character consistency is not one trick — it is four anchors used together: reference images, seed control, locked appearance descriptions, and prompt discipline. Master one and you will improve. Use all four and your characters will hold across entire sequences. The creators whose AI videos look “impossibly consistent” are not using secret tools. They are just refusing to let any single generation improvise the face.